
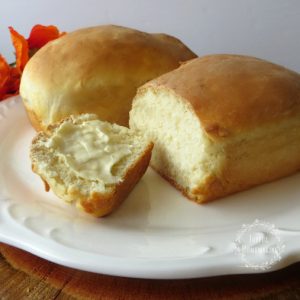
Kid Friendly Bread in a Bag Mini Loaves
My youngest two children have a wonderful Vacation Bible School that they attend every year, and the last few years, one of their favorite classes to take was the cooking class.
I find this a bit humorous/ironic, because usually when I ask them to help me in the kitchen, they are suddenly “too busy.” 😛 I am glad though that they have enjoyed the cooking class so much, and at the end of the week, the teacher gives them a booklet of all the recipes they’ve tried that week.
One of the recipes that we all taste tested, and enjoyed very much was Bread in a Bag Mini Loaves. Of course, it’s hard to go wrong with warm fresh bread, right from the oven and slathered with butter! Am I right!?

What makes this recipe kid friendly, is that a lot of the mixing goes on in a mess-free ziploc bag. Also, this is a very simple recipe, with no eggs, yet it’s delicious.

INGREDIENTS:
- 3 cups unbleached white flour
- 4 Tablespoons sugar
- 2 1/2 teaspoons rapid rise yeast or one 1/4 ounce package
- 1 teaspoon salt
- 3 Tablespoons oil
- 1 cup of warm (but not hot) water

INSTRUCTIONS:
In your gallon size or larger ziploc bag add: 1 cup of the flour, sugar, yeast and warm water. Then seal up the bag, and while doing it, let out as much air (out of the bag) as possible. Then you or your child can scrunch and squeeze the ingredients around in the bag, till they are mixed well together.

Let the bag set on the counter for 10 minutes, so the yeast can begin to work.

Then open the bag again, and add another cup of the flour, the oil and the salt. Close the bag and repeat scrunching and mixing. Finally, open the bag again, and add the final cup of the flour, and mix one last time.

Lay out a sheet of wax paper lightly dusted with flour, and pour the mixture onto it.

For around 5 minutes (or less), knead and work the dough till it’s all nice and smooth. Divide the dough into two portions, and place each into mini loaf pans that have been sprayed with cooking spray. (Mini loaf pan size is 5-1/2″ x 3″ x 2-1/2″ ).

Set your dough loaves in a non drafty warm spot, and cover them with a clean kitchen towel. Let them raise for 30 minutes to an hour, till they’ve almost doubled in size. If they don’t get a whole lot bigger, don’t worry, they will raise some in the oven too.
Bake for around 25 minutes, in a preheated 375 degree oven, or until bread sounds hollow when you tap it on the top, and the top is a pretty lightly browned color.
Kid Friendly Bread in a Bag Mini Loaves
Ingredients
- 3 cups unbleached white flour
- 4 Tablespoons sugar
- 2 1/2 teaspoons rapid rise yeast or one 1/4 ounce package
- 1 teaspoon salt
- 3 Tablespoons oil
- 1 cup of warm but not hot water
Instructions
- In your gallon size or larger ziploc bag add: 1 cup of the flour, sugar, yeast and warm water. Then seal up the bag, and while doing it, let out as much air (out of the bag) as possible. Then you or your child can scrunch and squeeze the ingredients around in the bag, till they are mixed well together.
- Let the bag set on the counter for 10 minutes, so the yeast can begin to work.
- Then open the bag again, and add another cup of the flour, the oil and the salt. Close the bag and repeat scrunching and mixing. Finally open the bag again and add the final cup of the flour, and mix one last time.
- Lay out a sheet of wax paper lightly dusted with flour, and pour the mixture onto it.
- For around 5 minutes (or less), knead and work the dough till it’s all nice and smooth. Divide the dough into two portions, and place each into mini loaf pans that have been sprayed with cooking spray. (Mini loaf pan size is 5-1/2″ x 3″ x 2-1/2″ ).
- Set your dough loaves in a non drafty warm spot, and cover them with a clean kitchen towel. Let them raise for 30 minutes to an hour, till they’ve almost doubled in size. If they don’t get a whole lot bigger, don’t worry, they will raise some in the oven too. Bake for around 25 minutes, in a preheated 375 degree oven, or until bread sounds hollow when you tap it on the top, and the top is a pretty lightly browned color.
- Let them cool in the pan for just a couple of minutes, and then turn them out onto a cooling rack or clean towel.

Let them cool in the pan for just a couple of minutes, and then turn them out onto a cooling rack or clean towel.

Slice and serve with butter, and enjoy! It’s so yummy, and your kids can have fun helping you too!

Need Help Getting Dinner On The Table???
Get 30 quick and family-friendly dinners with recipes and a ready-made grocery list—making mealtime stress-free and delicious!
I love that this is kid friendly. I am making this with my eight year old over Christmas break. Thank you!
looks like a great activity for kids!
I love the idea of this! Getting kids in the kitchen is so great and making it fun is key
This looks like a great recipe for little hands! It can be hard for kids to knead dough.
It helps contain the mess too!
What a fun project to do with kids! So glad you’ve joined us again for the What’s for Dinner party!
I hate to be off-topic here – but LOVE your kid’s Pokemon Eevee shirt. Do you remember where you got it? We have a big Pokemon fan in our house! : )
He he he, 🙂 I believe we got it at Kohl’s: https://www.kohls.com/product/prd-2665833/mens-pokemon-gang-tee.jsp?prdPV=15
Can I bake it in one standard loaf pan instead of 2 mini ones? Would it change the cook time any?
It may need another 5 to 10 minutes. When it sounds hollow when you tap the top with your fingernail, and it’s a nice golden color, it should indicate it’s done.
Is it self rising flour or all purpose?
Regular all purpose flour 🙂
I made this today with my home prek group (3-5 year olds). What a great activity to do after reading The Little Red Hen! Super simple recipe with ingredients we had on hand and it came out fantastic! So yummy!
Amazing! My 9 year-old son chose this recipe and we made it together with the help of one of his neighborhood buddies and it turned out beautifully! They had so much fun and it was delicious. I had hoped he’d gift one of the loaves, but he ate half of one shortly after it was cool enough to eat! But, I’ve promised to let him make more so he can show off his bread making talents. Thanks for a great recipe!
I’m so thrilled you enjoyed it! 🙂
can you up size the recipe to make 6 mini loaves if you have a multi pan?
I think it would work fine! 🙂
I want to thank you so much for posting this. I am in the process of becoming a preschool teacher and I needed to do some lesson plans and when I came across this one, it made me smile and I had to use it. It included everything that I was looking for. Science, Social Studies, and Math. From the bottom of my heart thank you so much.